Thursday, October 15, 2009

Au revoir, les français!

This is it. The contract is over, I've left the apartment, packed everything and moved to Greece. I enjoyed this year in France. Work was nice, I learned a lot of new things, I started a couple of interesting projects that I'm going to keep working on, and I'm definitely going to visit Grenoble again. The food was great, good quality ingredients were easy to find and cheap, and eating out was a source of cooking ideas almost every time, too.

But, the year is over, and this chapter is now closed. I packed everything I could carry, left my apartment and came back to Greece. I'm joining the military for six months in a couple of weeks. So, there's not going to be much posting from now on. If anything, it'd be a wrong to title it "francophagie." Thanks to everyone that read the posts and commented (in here or otherwise).

On the other hand, moving out of France and going to the army doesn't mean I'll stop cooking. I just won't be posting for a while. And I've already gotten a few of the same (or stronger) cannibalistic tendencies from interactions with the Greek bureaucracy. So, I may be back in six months, with another title... Oh, and it'll be two of us cooking from now on!

So long, France, and thanks for all the croissants!

Thursday, July 23, 2009

Crème caramelée

It's only a few days until vacation time, and that makes it really hard to focus on work. The unbearable heat doesn't help, either. With 3 desktop PCs always on at the office, it gets at least a couple of degrees hotter than outside. Of course, there is no air-conditioning, and when I'm typing, my wrists touch the hot surface of the overheated laptop. Unfortunately, the coolness of Mac laptops is limited to the metaphorical; the "air" should have been called "plasma" instead. Remember that wet wristbands help you cool down when exercising? For the same reason, touching the underside of your wrists on a hot laptop in a hot room for most of the day produces a constant feeling of getting burned, or to use the cooking euphemism, caramelized.

To make caramel, all you need to do is burn some sugar. Wet the sugar a bit at first, so that it will be liquid in the pan and remain liquid as the water evaporates and the sugar melts. This way, when all the water is gone and the sugar gets burnt, it'll be done evenly. Keep moving it around by tilting the pan. The moment it turns brown take it away from heat. You might need to stop it from burning further by touching the underside of the pan on some water momentarily, if you take it off the heat too late.

After a while, it starts to cool down and becomes thicker. Use a spoon to take a bit and let it flow back into the pan. When it's ready, it will have a honey-like consistency, and there will be an even string of caramel flowing from the spoon to the pan. You can make caramel baskets then, using a ladle. Move the spoon back and forth over an inverted ladle so that the string of caramel stays on the ladle. Keep moving the spoon back and forth, making crisscrossing threads of caramel on the back of the ladle. Also make some cyclic ones around the edge. The caramel thread solidifies very fast and will stay there. Use a pair of paper-scissors to cut the extra strings from around the edge, let the ladle cool down, and the "basket" should be easy to remove.

It took me a couple of tries to make an acceptable basket and unmold it successfully. Luckily, you can always recycle the failed attempts and any extra threads, by dropping them back into the pan to melt again.

At first, I just made the caramel to play around a bit, and was going to throw it away afterward. But then, I thought about crème caramelée, a nice, light, easy dessert. Spoon some of the still-liquid caramel into three ramekins so that it just covers the bottom, and set aside to cool and harden. Set a cup of milk with a drop of vanilla extract (or vanilla bean, if you have some) over medium heat, and stir occasionaly to avoid a skin from forming on the surface. While waiting for the milk, whisk an egg yolk, an egg, and three spoons of sugar, until the sugar dissolves. When the milk starts to bubble at the edges, take it off the heat and whisk it slowly, little by little into the egg mix, to temper it without cooking the egg.

Then, ladle the custard mix into the ramekins. Keep a spoon inverted close to the caramel, and ladle the mix so that it drops on the spoon and flows down, to avoid "digging" a hole into the caramel with the hot custard mix. Put the ramekins in an oven pan, move to a medium-hot oven, and fill the pan with hot water to half their height. Cook until a toothpick comes out clean.

Let the custards cool down, and then refrigerate for an hour.

To serve, run a knife around the edge, and flip over a plate.

The hard caramel has turned into a nice runny syrup. Soak the ramekin for a while before washing if there's some hard caramel left in it. If you have some caramel left in the pan, you can make extra caramel syrup for garnishing by adding some water (carefully if the caramel is hot), moving back over low heat, and stir until all the hard parts dissolve. Let it cool and it will thicken into a nice caramel syrup. Alternatively, do the same with heavy cream to get butterscotch, which is also nice for garnishing desserts and ice-creams.

I added some extra caramel syrup around the custard, and covered it with a caramel basket for garnish.

Here it is, a nice chilled vanilla custard, served with both liquid and solid caramel.

To eat, break the basket with the back of the spoon, and spoon together the bits of caramel thread, the vanilla custard and the caramel syrup.

Monday, July 20, 2009

Pizza and dessert

A while back some friends that were visiting France for a conference came for dinner. We made a quick pizza with ham, tomato sauce (oil, onion, garlic, tomato, pinch of sugar, salt, pepper) fresh tomatoes, mushrooms and two kinds of cheese.

For the dough mix flour, yeast, salt, water, and an egg. Normally you don't need an egg, but we were hungry and didn't want to wait long, so I used an egg for the extra protein to make the dough more elastic faster, instead of more kneading and more waiting for the yeast.

While waiting for the pizza, I also made a dessert. We also had some chocolate ice-cream with it, a nice contrast to the hot fondant.

Is there such a thing as too much chocolate?

Chocolate soufflé moccha cake

You might want to skip this one if you're on a diet. This is a cake I improvised during a weekend. It came out alright, so here it goes.

First I made a chocolate soufflé:
  • 9 eggs, separated
  • 1 cup of sugar
  • 1 pound dark chocolate
  • 1/2 cup butter
Butter and flour a tall round baking pot. Melt the chocolate with the butter in a bain-marie (or in the microwave, carefully) and set aside. Beat the yolks with most of the sugar (keep a spoon for the meringue) until they turn ivory. Beat the whites into a meringue with 1 spoon of sugar. Fold the chocolate in the yolk mixture, and then gently fold the meringue in, careful to keep most of the air. Move to the buttered baking dish, and cook in a medium hot oven until it's slightly jiggly in the center. Let it cool, unmold on a plate, and refrigerate overnight.

The next morning, I made some pastry cream:
  • 1 cup of milk
  • 1 cup of cream
  • vanilla extract (or bean, if you have)
  • 4 spoons of flour
  • 2 egg yolks
  • half a cup of sugar
  • half a cup strong coffee
Set a pot with a cup of milk and a cup of cream over low flame. Add some vanilla, half the sugar and strong coffee. At the same time, beat one egg yolk with the rest of the sugar until ivory. Sift four tablespoons of flour in, and mix. Keep stirring and add the hot (but not boiling) milk and cream. Move to the pot over low flame and stir until it thickens. Set aside to cool, and mix often to avoid a crust. I didn't, so I had to peel the crust off when it was cold and eat it, sadly.

For garnish, I made a ganache and some whipped cream:
  • 250g heavy cream
  • 250g dark chocolate
  • 1 spoon of confectioner's sugar
Whip half the cream with the confectioner's sugar until it formed soft peaks for the chantilly cream. Warm the rest up and mix with the chocolate, stirring until all the chocolate melts and the mix becomes smooth.

Then, bring it all together. Using a long serrated knife, slice the tall soufflé into three layers. Alternatively, use a normal knife to make a shallow cut all around at one third of the height, wrap the cake using a piece of thread so that it's in the cut, and pull the two ends of the string to make a very even cut. Repeat for the other layer.

Place the widest layer on a wide dish and spoon half the mocha cream on top. Put the next cake layer over, and top with the rest of the mocha. Finish with the third layer of cake, then garnish with the ganache. Pour a spoon of ganache on the top of the cake, and push it around with a spatula to cover it. Keep pouring one spoon of ganache at a time on top of the cake, and push it around with a spatula to drip evenly around the cake. Wipe any excess ganache from the bottom of the plate, make sure the cake is coated on all sides, and refrigerate for the ganache to set. After a few hours, garnish the cake on top with the whipped cream.

Overall it was nice and very chocolaty. The soufflé was nice instead of an actual cake, even though it doesn't have flour, because it was moist and hadn't deflated. The coffee flavor combines well with the chocolate and stops it from being overwhelming. I didn't use too much sugar and the chocolate was 75% cocoa, so it wasn't very sweet either, just right. If I was to change anything, next time I might try to get a little cognac somewhere in there. It is excellent with a bitter espresso.

Ratatouille

Ratatouille is a fast and tasty (and vegetarian) side dish.

Ingredients
  • 2 onions
  • 2 cloves of garlic
  • a bell pepper
  • 1 large eggplant (or 2 small)
  • 1 zucchini
  • 2 tomatoes
  • basil
  • parsley
  • dried thyme
  • olive oil
  • 1 spoon of tomato purée
Start by sautéing the garlic in a bit of olive oil, over a low heat, for about 30 seconds to 1 minute.

Add the onion and sauté until transparent. Then add the eggplant in cubes or thin slices, a pinch of salt, and toss it a bit with a wooden spoon to oil all around. After a couple of minutes add the zucchini, sliced, and the bell pepper, chopped, and another pinch of salt. Stir for 5 minutes and add the herbs and chopped tomatoes. If the vegetables haven't leaked enough juice to have a thick sauce by now, add a bit of tomato paste and if necessary, a few spoons of water, a final pinch of salt, and pepper. Cook for another 10 minutes.

You can eat it like that, hot or cold. I wanted to use it to escort some fish, so I moved it to serving-sized cocottes, topped with breadcrumbs and a drop of olive oil, and put them in the oven for a few minutes to get a nice gratinée crust. Alternatively, you can eat it the next day with an egg on top.

My favorite is to spoon it with some hot just-out-of-the-oven bread. (Yes, the small breadrolls leaked some cheese again, but I'll keep practicing).

Spanakopita

This is yet another post about dough. This one is a pastry dough called "phyllo", the Greek word for leaf. That name is very general, as it applies to any kind of dough that is rolled into a thin leaf. This specific one is a recipe I got from grandma, and is really good for making pitas. It's very similar to standard puff pastry (or pâte feuilletée) except there's no folding of the dough, resulting in a puff pastry with fewer, thicker layers.

The ingredients are the simplest ever: flour, water, salt. Like the original puff pastry, this one is unleavened. Start with two cups of flour and a pinch of salt, and keep adding water and kneading until you get a soft dough that doesn't stick to your hands. If you add too much water add more flour. Knead for about 10 minutes, then refridgerate for half an hour at least.

Take it out of the fridge, and roll it with your hands into a long worm, about 2 inches in diameter. Then cut that in half, again and again, until you get 8 to 16 pieces, the size of mandarin oranges. A kilogram of flour gives 16 small pieces.

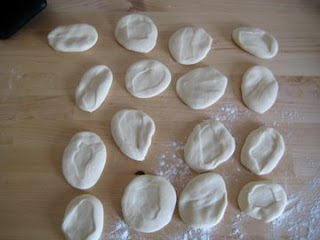
Roll each piece around in your hands to make it a bit more spherical, and press it down on the table to flatten it with your palm. Using a rolling pin, roll each into a circle of about 5 inches in diameter.

Take some softened butter or margerine with your fingers, and rub it softly on each circle before you stack the next one on top. I made 4 stacks of 4 pieces each, with butter inbetween. Don't butter the bottom and top layers! Then refridgerate for 20 minutes. At this point, if you have made too much dough, you can wrap each stack in tinfoil or plastic wrap and freeze them. Take them out of the freezer to thaw the day before you need it, it's as good as fresh.

When ready to use, sprinkle flour on the table, and gently roll each stack into a thin wide sheet. It doesn't have to be extremely thin, 1mm thick is fine. Yielding to popular demand, I made mine into a spanakopita. This might seem like a sacrilege to many fellow Greeks, but I don't like feta, so my pita was cheeseless.

For the stuffing, chop and blanch the spinach for 3-4 minutes to soften it a bit, drain and mix with chopped dill, scallion and parsley. Add one egg (or two if you have a lot of stuffing), salt and pepper, a couple of spoons of olive oil, and mix. You can add feta to taste, too.

Then roll one of the sheets of dough around the rolling pin and transfer it on an oven pan. Stretch it to cover the whole pan, with some dough over the edges. Sprinkle some olive oil and add another sheet if you rolled them too thin. Spread the stuffing all over, and then transfer another sheet of dough over it, also stretching it to go a bit over the edges.

Drizzle some olive oil on top, and add another layer of dough, if it's too thin. My first top-layer wasn't big enough so I used a second, wider layer on top of it. Make sure you oil or butter the dough around the edges in between the sheets. This is not the time to cut down on fats, so use lots of oil on the edges.

Then roll the dough that is hanging over the edges, to seal it around. This is my favorite part of the pita, the rolled and crunchy phyllo at the corner piece. Again, make sure it's oiled there. Finally, sprinkle some extra oil on top, mark pieces with a knife, stab it a few times to let the steam out during cooking, and bake in low to medium heat for about an hour, to an hour and a half.

Unfortunately my gas oven only heats things from underneath, so I didn't get the golden-brown color that I should...

... luckily, people still liked it.

Saturday, July 18, 2009

Œuf cocottes

This post has been in the draft list for a while now. So, here it is, a quick snack.

In French, cocotte is usually what in English is called a Dutch oven. It can also mean a hen, or a... woman of questionable virtue and high maintenance.

However, cocottes come in much smaller sizes too, and you can use them to cook single servings. An œuf cocotte is a fancy name for what is really just an egg in a ramequin. It's a quick snack, and easy to make too.

I made a couple of œuf cocottes a while back, with some bits of ham, cheese, tomato, basil and, of course, an egg on top. I had some stuffing left and I put some cheese over it, for a cocotte gratinée. This is also easy to do with leftover foods, and especially good with yesterday's ratatouille. A small trick: before breaking the egg wipe it and push it on the middle of the stuffing to make a small crater. Then break it close to the cocotte careful not to break the yolk, so that it rests in the middle. Cook in the oven for a few minutes depending on how runny you want the egg.

Mmm, quick and tasty.